
When making your own videos with your own video camera, you need to think about many more factors than when just recording your desktop with Simple Screen Recorder. Some of these factors include any limitations in the settings available on your camcorder, the file size and the room available on your video camera, the lighting available in the location the video will be taken and how you will capture the sound. But if the ultimate goal is to load your video to YouTube or some other website, and you do not want the quality of your video reduced by multiple formatting conversions, then many of the choices will already be made for you. So we will begin by taking a closer look at what YouTube likes best in the way of video settings.
Video Settings Preferred by YouTube
Video Resolution: 720p (also known as 1280×720) is preferred
For historical reference, the TV sets many of us grew up watching were 640×480. Yet many modern high definition TVs have a resolution of 1920×1080. Is this high of a resolution really needed? YouTube can actually upload videos in many resolutions and formats – including many more formats than they indicate on their website. YouTube has amazing converters that can instantly recognize the video format you submit to them and then magically convert it into the format that they like. But even the best conversion programs result in an unpredictable loss of quality. The image may stutter, the sound may change and even the color balance and focus may change. The way to get a more predictable result is to load a video that YouTube will not try to convert. One easy way to tell what YouTube likes is to open up the Firefox web browser, then go to any YouTube video and click on the Firefox downloader tool that we discussed in a previous article. You will get a list of download options that will look like the following:
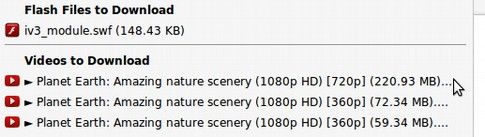
Note that even if the video was uploaded into YouTube with a 1080p HD resolution, it can only be download in a 720p resolution. Note also that the file size of the 720p resolution video is three times large than the 360p version of the same video. The p stands for pixels. But it also stands for the number of horizontal lines in the video. Since YouTube uses a ratio of 16:9 in their videos with 9 being the vertical dimension, a 720p video is actually 1280×720 pixels. This is called “HD” Resolution.
A couple of years ago, YouTube announced that you could load a “Full HD” resolution video of 1920×1080, also called 1080p (which is the height of the video in pixels). However, many folks have concluded that this merely gets converted into a 720p video by YouTube. In fact, some claim that the 1080 videos they load to YouTube are a lower quality that the 720p videos they load to YouTube. Either way, since there is no benefit to 1080p videos and since their file size and loading time are much greater than 720p videos, we recommend that you use a resolution of 720p (also known as 1280×720 for your YouTube videos. 720P will also take up less space on your video camera.
What about the Resolution for Watching Videos on a Big Screen TV?
Some have advocated for making 1080p videos anyway even if there is no advantage when posting to YouTube. They argue that 1080p is better than 720p when watching TV or when blown up at an educational conference. This seems logical. But we also need to consider the resolution of the human eye. The fact is that there is almost no difference that our eyes can notice between a 720 HD TV display and a 1080 HD TV display. Mathematically, to tell the difference between a 720p display and a 1080p display with a 42 inch monitor, you would need to sit within 5 feet of the monitor to see a difference. Even for a 50 inch monitor, you would need to sit within 6 feet of the monitor to see a difference. Obviously, sitting this close to a huge screen is bad for your eyes and bad for your health. Folks buy the larger resolution just because they can and they think more is better. There are also lots of limitations to making 1080p HD videos for a reasonable price. So save yourself the pain and stick with making and posting 720p HD videos.
Video Container and Codec: MP4/H.264 is preferred
Although the title for the above video was too long to display the file name, if you choose a shorter video, you will see that the first choice to be downloaded is MP4.
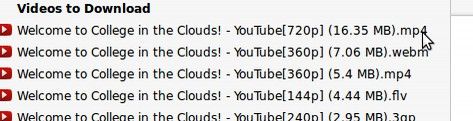
Youtube will let you download videos in other file formats, but they clearly prefer MP4. This is because MP4 is somewhat of a universal file format. But also it is more efficient than other file formats. Note that there are two 360p options. The MP4 version of the above video is 30% smaller in file size than the webm version of the same video. This is why website owners prefer to post MP4 videos on their own websites. It is because they want a smaller file size so that their page loads more quickly. It the website page loading business, anything over 1 MB is considered huge. So 5 MB is certainly better than 7 MB and it is also better than 16.35 MB. The file size of this brief 2 minute video with 1080p would be nearly 3 times bigger than this at about 40MB. If you do some further research on the internet, you will find that the preferred Codec is called H.264. There is a downside to this that you are not supposed to charge for H.264 videos. But since we do not charge for YouTube videos anyway, this is not much of a problem.
Frame Rate: 30 Frames Per Second (FPS) is preferred
There is a lot of discussion on the internet about frame rates. Hollywood typically uses 24 FPS. The maximum available is about 60. So why did YouTube chose 30 FPS? The likely answer is that they know their videos will be watched either on computer monitors or TV monitors – both of which are set for 60 hz or 60 cycles per second in the US and Canada (Europe and Asia are slightly different). 30 FPS simply displays better in the US because of the monitors it is being viewed on.
Interlacing or Progressive Frame Rates?
When setting the frame rate for your video, you may seem the letters “i” or “p” at the end of the setting. In this case, p does not stand for pixel. It stands for progressive. The "i" or "p" after the capture rate or frame rate indicates whether or not the video is interlaced or progressive. 60i indicates that the video will be 60 "fields" per second where each field is only half of a frame. The word "interlaced" means that each field consists of the odd rows or even rows in the picture. In contrast, 30p video displays one entire frame every 1/30th of a second so one entire frame is displayed at a time and the video recording progresses from one frame to the next rather than having each frame interlaced with the frame before it. In our opinion, 30p is better than 60i because you can freeze the film at any point in the video and look at your screen, you'd see a complete photo of the scene. With 60i, only half of the entire picture is updated every 1/60 of a second which means at any given time, only half the frame is displayed and the other half is 1/60th of a second "old". This can blur details of moving objects.
Setting for other video production tools
This effort to be compatible with YouTube and combine high quality with a reasonable video file size is why we set our Simple Screen Recorder settings for a resolution of HD 1280×720 with a Frame Rate of 30 FPS and a Codec of MP4/H.264. It is also why we use these same settings when creating an Open Shot project and when exporting a video from Open Shot. At each stage in the process, we are able to keep the video looking almost the same as it will look on YouTube. Compatibility is also why we set our audio for MP3.
How to Create Real World Videos with a Video Camcorder
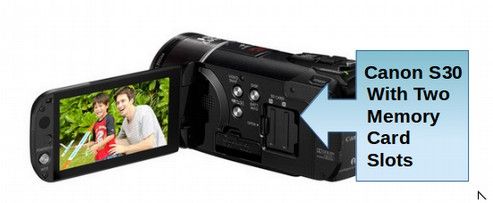
While you can create real world videos with most smart phones, you will have more control over your video clips video quality, video colors and video framing (zooming) if you get an actual video camera and tripod. There has been a significant improvement in personal video recorders in the past 10 years such that many can record in high definition (either normal high definition of 1280×720 or the newer Full HD of 1920×1080). Some also offer much better zooming capabilities than past camcorders and better low light performance for indoor recording. Cannon has been the leader in this innovation of low light high performance medium cost image stabilizing video cameras. They offer a series of 20 models of cameras from $500 to $2000 that are high definition camcorders. However, only a few have a view finder, image stabilization. Only some have the ability to take still shots and only some have one of two additional slots to add MicroSD memory cards. The least expensive option that had all of these features was the Canon S30 – which is why we got this camcorder a few years ago.
Memory Card Terms, Features and Issues
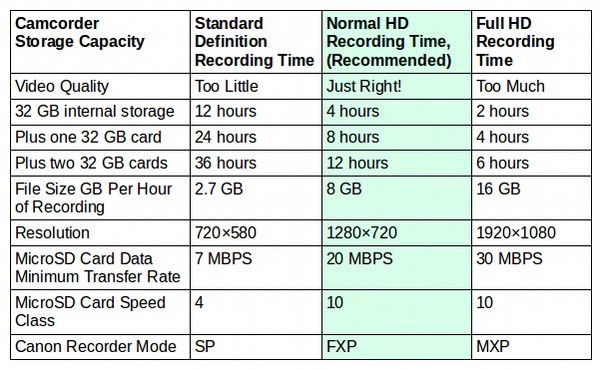
The MicroSD memory card issue is important if you want to take a lot of videos at an educational conference and then process them after the conference is over. HD recording takes up a lot of space. Depending on the type of resolution used, an HD video takes up 8 GB of space for every hour of recording time. So a camcorder with 32 GB of internal storage can take about 4 hours of video before it needs to be downloaded to your computer to start over. If the camera also has a separate 32 GB memory card, it may automatically transfer recording from the internal storage to the external memory card – allowing for an additional 4 hours of recording. If there are two memory card slots, you can have up to 12 hours of recordings before needing to transfer it all to your computer (assuming you have a computer that can handle loading 96 GB of data on it). A 32 GB high speed memory card costs about $20.
Below is a table comparing the recording times for of a standard resolution (720×580) to a normal high definition resolution of (1280×720) to Full HD (1920×1080).
How to get the Correct Memory Cards
The most crucial feature to look for in a MicroSD card is one that is compatible with your
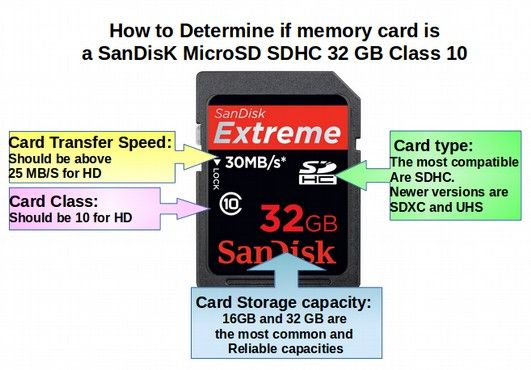
camcorder and computer. Be aware that there are also 64GB “SDXC” memory cards. But these are not compatible with older computers or camcorders. There are also SDXC UHS (Ultra High Speed) memory cards. But these are only compatible with the newest camcorders and computers. We use a Canon S30 because it has two memory card slots. The S30 is lighter than the newer Canon G10. But it uses older card reading technology meaning that it will not read the newer UHS (ultra high speed) memory cards. Thankfully, the S30 will read Class 10 SDHC memory cardswhich are adequate for recording normal high definition 720p or Full HD 1080p videos. Some brands of memory cards such as SanDisk have a higher transfer speed than other less expensive memory cards even for the same class of card.
Be careful not to buy a UHS memory card unless you know your camcorder can handle it. If you have a five year old camcorder, be aware that they may not accept the very latest UHS memory cards. But they can take high definition videos if you get the class 10 SDHC memory card. Specifically, 10 cards have a transfer rate of 20 to 30 Mega Bits per second (MB/S). To add even more confusion to this issue, some class 10 cards are faster than some class 10 cards. So what you really need to look at is the read/write data transfer speed on the card rather than the class on the card. For example, the Class 10 Sandisk card shown above specifies a minimum of 30 MB read write whereas the Class 10 Transcend card is only 17 MB write. The reason this is important is that to record a 1080HD video using the H264 Codec (used by Canon) requires a speed of 30 MB/S. Yet some older Canon models are not able to handle more than about 30 MP/S (which is why they do not work with the UHS cards that write at 50 MB/S). So be very careful about the kind of card you buy if using an older camera but want to record in 1080HD. Alternately you can buy a newer camcorder with a UHS rating and then buy UHS rated memory cards.
Why a Tripod?
No matter how steady your hands are, a tripod is always better. Not only is it easier to keep the video on the subject, but it is easier to keep the video in focus and reduce blurring – which can be a problem at 30 FPS. Most Canon models come with a remote control allowing you to mount the camera on a tripod and take a video of yourself zooming in and out with the remote control.
Four External Microphone Options
Because the sound can matter almost as much to the quality of the video as the images, we invested in a couple of different external microphones. The four options you will need to consider are a shotgun microphone, a wireless lapel clip microphone system, wired lapel microphones and/or a two track digital lapel microphone system.
#1: Shotgun Microphone
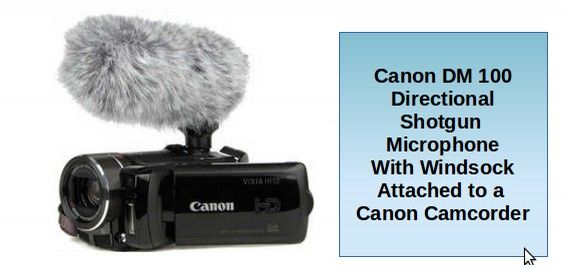
The first was a directional microphone also called a shotgun microphone that picked up sound in the direction it was pointing while reducing sound coming from other directions. This is in contrast to the internal Canon microphone that picks up sound from the entire room – leading to the echo effect common in many personal videos. A directional microphone is also ideal for recording outdoors. There was only one shotgun microphone that could be securely clipped into the “accessory shoe” of the Canon S30 camcorder. It was called the DM-100 Directional Microphone. It comes with a removable wind sock and cost about $200 and allows one to capture an interview within a group without each person having a lapel microphone. There are three settings on this microphone, shotgun (about 30 degrees), 90 degrees and 120 degrees.
The shotgun microphone setting is to only record sound from a narrow direction. But the problem with this is that it does not pick up the deeper sensor elements on the side of the microphone. This is why many prefer the 90% setting as it also does a good job of eliminating background noise and noise from the camera while picking up any sound that is in the field of view of the camera and having a more well rounded sound). The third setting of 120 degrees does not seem to work very well. Either way, this shotgun microphone is very sensitive and can pick up conversations 20 feet away.
#2: Wireless Lapel Clip Microphone System
Wireless lapel clip microphone systems involve a radio transmitter attached to a lapel clip microphone which transmits a signal to a receiver that is attached to your camcorder. You usually need at least two of these clip microphones – one for the interviewer and the other for the guest. Wireless microphone systems can get quite expensive ranging in price from $500 to $1,000 or more. However, you can get a very basic dual channel wireless lapel clip system with two headsets and two lapel mics for about $150. Here is a video link to this option.
http://www.amazon.com/Audio2000s-Wireless-Microphone-Headband-Lavalier/dp/B001RRJ1AK/ref=pd_cp_MI_0
#3: Create an Inexpensive Wired Lapel Clip Microphone System
If you do not mind wires running from the lapel clip microphones directly to your camcorder, you can create your own two person lavalier system with two lapel clip mics tied into the same input by first attaching a splitter to the camcorder sound input and then attaching extension wires that run to the host and guest and then attaching the lapel clip mics to the extension wires. This allows two people to talk in a hands free conversation with almost no background noise. A problem with most inexpensive wired lapel clip microphones is that they require small batteries that have no warning of when they are about to go dead. This can mean lost of lost recording. Thankfully, Sony now makes a good omnidirectional clip style mic (model ECMCS3) for about $21 each that does not require a battery. It works on most but not all modern camcorders. It does require changing the settings of the camcorder to turn the normal audio off and some changes in other settings to get the volume to work correctly. This clip mic records in stereo! This is a link to this new microphone. http://www.amazon.com/dp/B0058MJX4O/ref=pe_385040_30332200_TE_item
You will also need a $6 splitter. Here is the link.
http://www.amazon.com/dp/B0081ZBNI4/ref=pe_385040_30332200_TE_item
You will also need a $10 high quality shielded extension cable. The shielding is needed to prevent the cable from picking up interference. Here is the link.
http://www.amazon.com/dp/B003L139HG/ref=pe_385040_30332200_TE_item
Here is what all three look like:
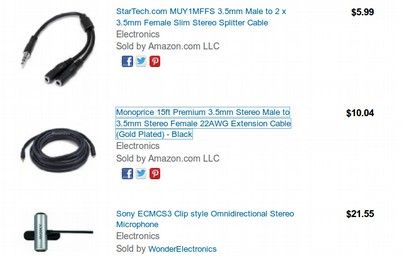
For less than $70, you can create a high quality wired lapel clip system.
#4 Lapel Clip Microphones attached to a Portable Digital Recorder
If you are not able to get the Sony Clip Microphone to charge or work with your camcorder, do not send it back. Another perhaps even better option is to combine it with a digital recorder. This will create an MP3 audio file that you can load onto your computer and then add to your video track with the Open Shot Video Editor. To sync the audio track with the audio track of your video recording, clap your hands and then use this signal to match the timing of the two audio tracks. Then delete the audio track that came with the video track and replace it with the track from the digital recorder. This eliminates the need for the extension cable and the splitter as the Sony clip microphone can be plugged directly into your digital recorder – creating a wireless lapel clip system.
A Clip Mic and Digital recorder are a minor hassle to add to your videos. However, they result in extremely good sound quality compared to a shotgun mic or the video camcorder's built in mic Besides the two microphones, you will need to get a portable digital recorder. There are literally dozens of models to choose from ranging in price from about $50 to $500. However, most of the lesser expensive options only have one recording channel and/or poor quality sound. This is why the four most popular options run from $100 to $200. We will compare the two least expensive dual channel options, the Tascam DR05 to the Zoom H1 (both are about $100). We will then compare two more expensive options: the Tascam DR40 to the Zoom H4N. The Tascam DR40 is about $155 with mail in rebate and the Zoom H4N is about $200.
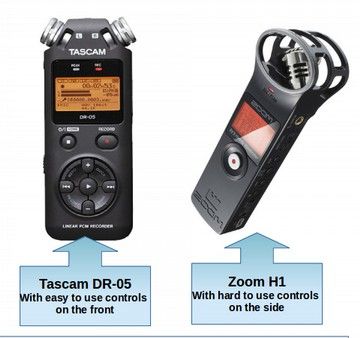
The Tascam DR05 and the Zoom H1 both come with 2 mics with similar sound and the ability to add an external mic. But the side mounted controls on the Zoom H1 is very difficult to use while the controls on the Tascam DR05 are as simple as using your TV Remote Control. The battery life of the DR05 is also much longer as it uses 2AA batteries while the Zoom H1 only uses 1 AA battery. We therefore recommend the Tascam DR05 if you are looking for a digital recorder under $100. We also recommend the optional AC adapter which will be another $22. Get model PS-P515U. The Sony ECMCS3 Clip Mic works well with the DR-05, but you do have to change the mic settings on the DR-05.
Given how important sound quality is to video production, it is not surprising that the most popular digital recorders are both 4 channel, two track recorders. The most popular model is the Zoom H4N which is about $200. However, the Tascam DR40, which is about $155 after rebate, has some significant advantages over the Zoom H4N.
First, the two internal microphones of the Tascam DR40 are much better protected that the internal microphones of the Zoom H4N (which are completely exposed to potential damage).
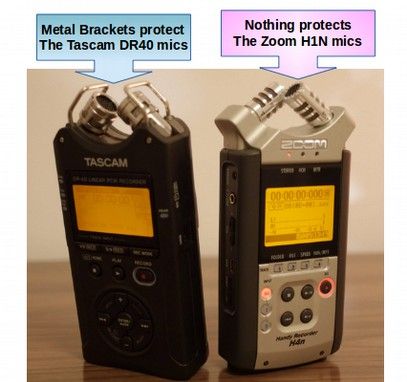
Second, like the Tascam DR05, the controls for the Tascam are mainly on the front, are better labeled and laid out in a more logical manner, similar to a TV remote control, whereas the controls for the Zoom are mainly on the side, are not logically organized and can be harder to learn and use. The following is a good video showing the simplicity of the controls on the Tascam DR 40. https://www.youtube.com/watch?v=jBbj9GpiRbQ
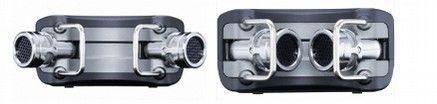
Third, the field angle of the internal mics is also more adjustable on the Tascam DR40 in that they can be pivoted out if you want to capture sound from a wider area of the room (such as a meeting or a conference) or pivoted in if you want to capture just the interview between two people. The wider angle is also important for capturing a group music performance. One the left is the AB option and on the right is the XY option.
Fourth, the DR 40 also offers dual recording at different gain levels so if one gain level gets exceeded, causing distortion, the lower gain level or safety track can be used instead. Some tests have indicated that the internal mics on the DR 40 are more sensitive than the H4N internal mics. This means that you are more likely to have to boast the H4N signal to the maximum in quiet situation recording speakers who do not project their voice.
Fifth, the Zoom brand has trouble with “time drift” meaning that the audio with a long recording or more than 10 minutes tends to go out of sync with the video.
Sixth, the DR40 has better settings if you simply want to use one external mic.
Seventh, the DR40 has locking XLR inputs whereas the H4N only has slide in inputs (that can slide back out way too easy).
Eighth, the DR40 can accommodate line level inputs whereas the H4N does not. This is only important if you plan to add an audio mixer at some point in the future – and only professional musicians really use audio mixers. But it is better to have this option and not need it than to need it and not have it.
Both recorders have many very nice features. For example, both allow you to record from the two internal mics and two external mics at the same time. These are recorded as two stereo audio files that can be then separated into four audio tracks by your video editor. Both also allow you to adjust the volume of the mics separately if one person is talking much louder than others. Both also allow you to dub over one track with a later track, something aspiring musicians really like to do.
For all of the above reasons, we recommend the Tascam DR40 if you want a four channel portable digital recorder. In addition to the recorder, you will want to get a portable AC adapter for about $20 and it is also a very good idea to get a remote control for about $20. This will allow you to set up the digital recorder near where the action is and then go back to your video camera to start the sound without moving the recorder.
It is also important to have some kind of stand for the recorder and not just lay it on a table. Audio mics will pick up sound bouncing off of a table or floor so some sort of stand is important. Many folks hang the mic over the head while others use a lapel mic like the Sony we discussed earlier. As a rule of thumb, the mic should be no closer than one foot away from the speaker, but no further than two feet away.
How to transfer your video from your camcorder to your computer
When your video is done, you can easily transfer it to any computer with just a mini-usb to normal USB connection. Some have claimed that Canon does not work with Apple or Linux computers. This is not true. It comes with an odd program that only works with a Windows computer. But the odd Canon program is not needed to transfer the files to either an Apple or Linux computer. What will happen is that the video file will be in a special Canon format called MTS. Despite claims to the contrary, Canon MTS videos can be loaded directly to YouTube. YouTube then converts the MTS file to an MP4 file. You are therefore better off converting MTS videos to MP4 files using the Open Shot Video Editor before loading them to YouTube. This way, you know what you will get before you load it.
How to transfer files from a Canon Cam Corder to a Linux Computer
Turn off the computer and camera to make the connection. After inserting the USB from the Canon camera to a Linux computer, and turning both on, you will get this message.
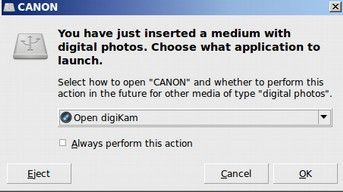
Check OK. Then from the main menu, open your computer hard drive. There are three folders that are opened in the file manager. You will see the following:
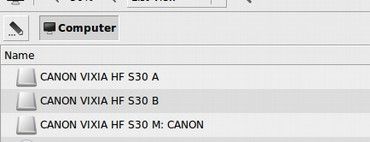
A and B are for the MicroSD card slots. Assuming the videos were recorded to the camera main internal memory, the M folder is for the camera internal folder. Click on the M folder to open it.
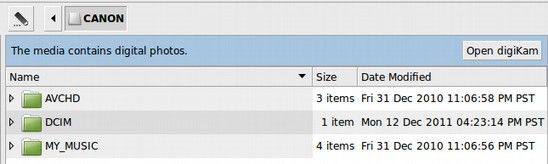
The MTS video clips are in a folder called STREAM that is in a folder called BDMV that is in the AVCHD folder. Transfer a copy of this entire STREAM folder to your file manager Videos folder. Make sure the power stays on to both devices while the transfer is taking place by having both your computer and your camera connected to their chargers. Once the transfer is complete, close the Canon folders and eject the Canon Drive by right clicking on the folder. Then play the videos from your file manager with VLC Media Player to see if they transferred properly. This concludes our introduction to taking your own videos. In the next article, we will look at one final way to create your own videos – by creating a green screen virtual studio.