
Make Sure You are Working on the Right Channel
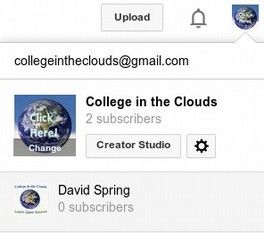
Whenever you are working on your Business YouTube channel, you should begin by making sure you are on your Business YouTube channel and not your personal YouTube channel. YouTube and Google Plus both have a nasty habit of switching you back to your personal account even after you have logged into and are using your business account. If the YouTube Home page has your name on it, then you are on your personal YouTube account. To switch to your Business YouTube account from your personal YouTube Home page, click on the icon in the upper right corner to bring up the following box.
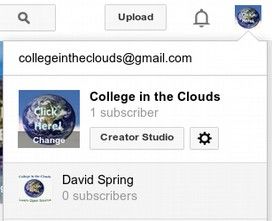
Click on your business channel. This will unfortunately take you to your Google Plus Business Home page. To reach your Business YouTube page, click on the Google Apps box in the upper right corner.
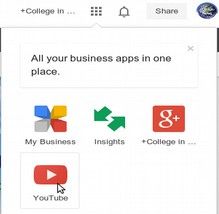
Then click on the red Youtube arrow. Then click on the small arrow to the right of the word YouTube in the upper left corner of the next screen. Then click on My Channel. Now you should see your business channel name.
Create Our Playlists
To create a new Playlist, from your YouTube Business Channel Home page, click on Playlists.
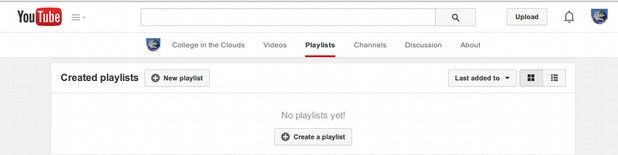
Then click New Playlist and give your Playlist a Title. YouTube only allows Playlists to be displayed in order from oldest to newest or newest to oldest. So give some thought to the order in which you create your Playlists. Because you will be stuck with whatever you create. In our case, we first created our Overview Videos Playlist called College in the Clouds Overview Videos. Then click Create. You can add a brief description to each Playlist after you create it. Here's a typical description we used: These videos are based on our course, book and website Create Your Own Video Channel. See createyourownvideochannel.org for more information.
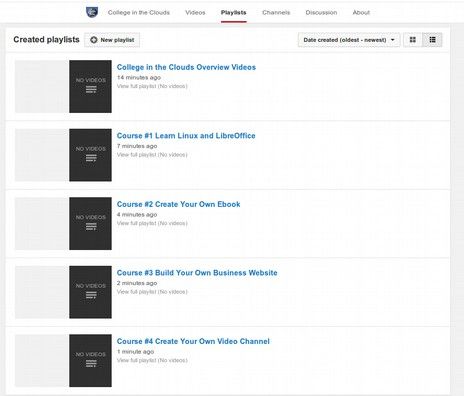
Type in a description. Then click Done. We then added the remaining Playlists in the order we want them to appear. In our case, it was a Playlist for our first course, followed by a Playlist for each remaining course. If you already have some playlists added to a new site with few or no videos, delete them and start over to get your playlists in the right order. First, delete all of the videos from the Playlist. Then click on Playlist settings. Then click Delete Playlist.
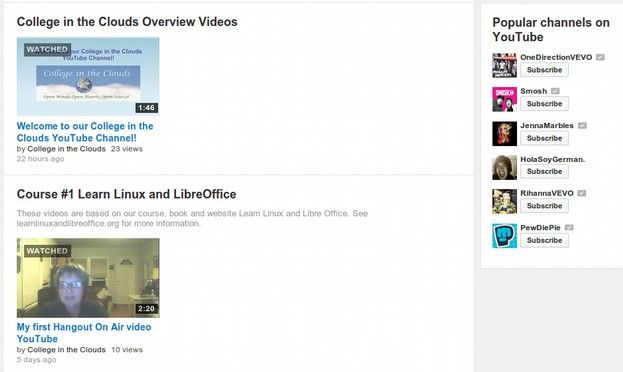
Below is our completed set of five Playlists.
Edit Your Introductory Video
To find your Introductory video, from your YouTube channel Home page, click on Video Manager at the top of the page. Then click on Live Events. Then change Upcoming to Completed. Check the box to the left of the video and click Edit to view it.

This will take us to the edit screen for this video.
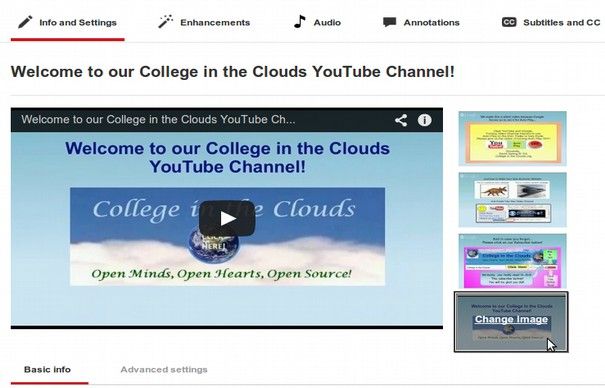
There will be some thumbnail images for the video. But you can upload a different image if you want that to be the thumbnail image. If you want to crop the video, click Enhancements. If you want to add a title or any other text boxes or links to your video, click Annotations. Here is a link being added to the last 15 seconds of the video
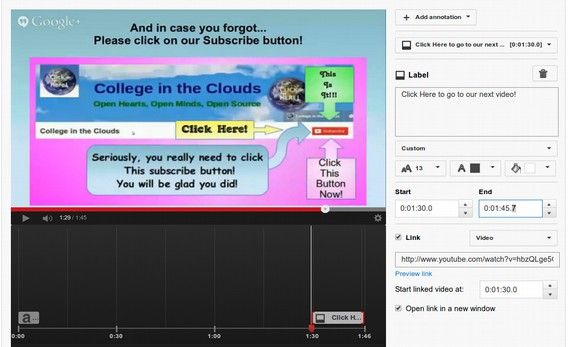
When you are done with adding Annotations, go back to the Info and Settings screen. Then click on Add to Playlist in the lower right corner and assign the video to a Playlist. We assigned our video to the College in the Clouds Overview Playlist.
Now that we have our Introductory video assigned to a Playlist, it is time to go back to our Home page and set up our channel trailer. To go back to your Channel Home page from the Video Manager, click on the YouTube Icon in the upper left corner. Then click on My Channel.
Two Different Edit Buttons... You Have Got to be Kidding!
Sadly, to make matters extremely confusing, there are several different edit buttons hidden all over your YouTube Channel Home page. Hover your mouse over sections of your Home page and you may see some of them magically pop up. Think of it as being like an Easter Egg Hunt. Hidden edit buttons makes it very difficult for those new to YouTube to understand how to change things. Since this is a page that only Channel Administrators will see, what exactly is the point of hiding administrative functions from the administrators.
There are also hidden buttons that look exactly the same in nearly the same part of the screen but have completely different functions. Here is a perfect example. In the upper right corner of the Home page in the cover image is what we will call the upper edit button.

If you do not see this edit button, it is likely that you are not logged into the “My Channel” YouTube Page. Click on My Channel in the upper left corner to see the edit button. Then click on the upper edit button to see two options. These are Edit Links and Edit Channel Art.
Just below the top edit button to the right of your channel name is a second lower edit button.
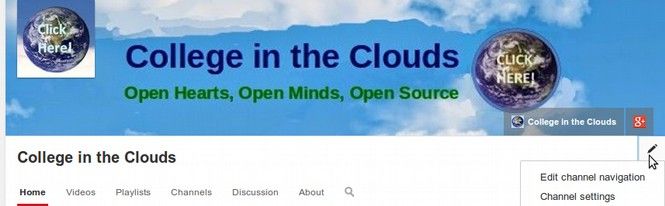
Clicking on the second lower edit button brings up two options. These are Edit Channel Navigation and Channel Settings. The reason this is important is that the way you add your Introductory video to your Featured Video area is by first going to the Edit Channel Navigation screen!
Edit Channel Navigation to Add Your Channel Trailer
Click on Edit Channel Navigation. This takes you to this screen.

The above has to be one of the most misleading names and descriptions I have ever come across. The name Browse in no way lets you know that this is really a setting to enable display of the feature video area. The description is even more confusing. The only way you know you should click on Enable is by doing an extensive Internet search.
When you do this search, you will find many channel owners who hate the Browse function and refuse to enable it. Part of the reason they hate it is because then they wind up with an Auto Play video on their Home page and they do not want sound to come blaring out the second someone visits their channel. We have solved this problem by creating a silent slideshow video.
They also hate it because they do not really understand how it works. There is almost no instruction from YouTube and this is a change Google made a couple of years ago that created all kinds of problems for existing channel owners. Hopefully, we will here provide clear and complete instructions that Google failed to provide and perhaps some of the controversy over Browse will die down.
To Browse Or Feed?
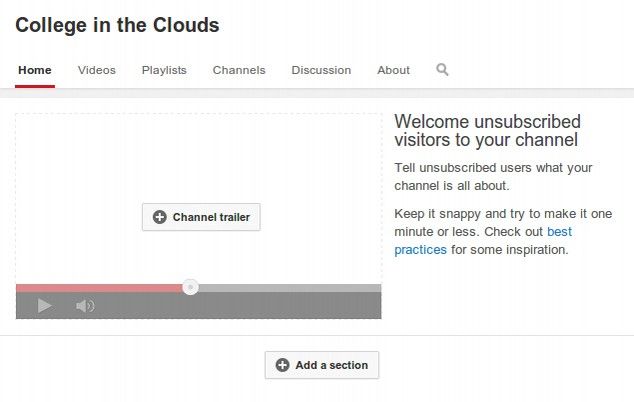
To be clear, you do not have to click on the Enable Browse button. YouTube offers two different ways to display you YouTube Home page. The default way is called the Feed Display. An Alternate way is called Browse. The Browse option displays a “Channel Trailer” Featured video to unsubscribed viewer and displays the normal feeder display or “sections” to subscribed viewers.
The Channel Trailer Featured Videos box also includes a subscribe button at the end of the Featured Video to help new viewers subscribe to your channel. The channel trailer is a short 60 second video that lets new viewers better understand what your channel is all about, why they should subscribe to your channel and watch more videos on your channel and how often you post new uploads to your channel. The reason we recommend using the Browse function is that not only does the Featured box look way better than the Feed Display, but Browse also allows us to create Sections and determine exactly what section boxes appear on the Home page. Below are the steps for doing this. In addition, you can elect to create the sections and not load a Channel trailer. We will explain all of this below.
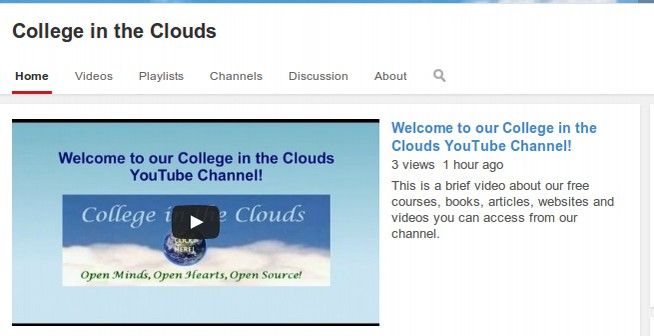
Click Enable and then Save to see what this looks like. You can always disable it later and go back to the Feed Display. Here is what the Browse Display first looks like:
Be aware that the Video Title for this Featured video should be less than 45 characters. Also be aware that the for the description to fit in the description box, it must be less than 144 characters. To add your channel trailer, click on Plus Channel trailer. If you have more than one video to choose from, you will see something like the following:
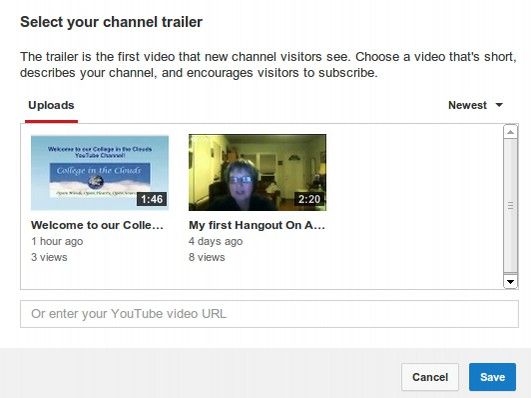
Then select your Channel Trailer video. Then click Save.
Once you have added a channel trailer, you have the option of editing it or deleting it later simply by clicking on the Edit Pencil in the upper right corner of the channel trailer. Be aware that if a visitor shuts off the Featured video, it will show up in their channel view as having “watched” this video. So be careful what video you elect to use as your Featured video.
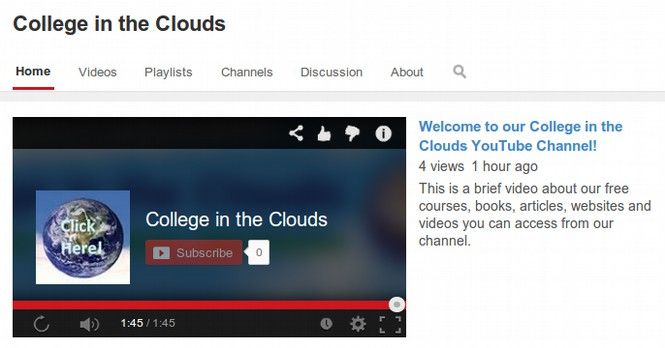
Click on it to play it to see if the words are readable. To see what it looks like to the Public, click on the View as Public Link at the top right corner of your YouTube Channel Home page. Notice that the video auto plays and that the title graphics plays also. The public version of your Channel Home page has a subscribe button. An additional subscribe button comes up at the very end of the video.
Create Custom Sections Below Your Channel Trailer
To add other custom sections below your channel trailer, click Add a Section.
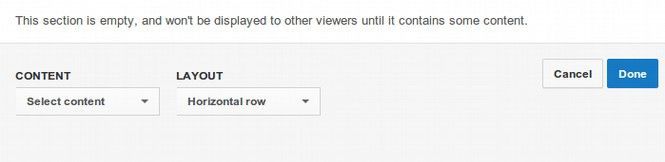
You will see Content Options and Layout options. Layout Options can be either a horizontal row or Vertical list. Click on the Select Content arrow to bring up lots of Content options.
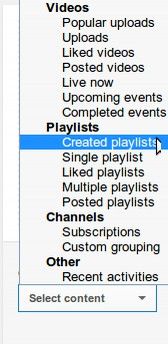
The most common option is to display your Created Playlists on your Home page. This is especially true if you have a lot of videos organized into a lot of Playlists. We will first add the Created Playlists section and below this we will add new sections for each of our individual Playlists. This will put all of the Playlists on our Home page so that new visitors who may not be familiar with YouTube will see them all on the Home page without having to click on the Playlist tab at the top of the Home page. Click on the dropdown arrow to the right of Select Content. Then select Created Playlists. It only displays Playlists with videos in them. And it insists on posting the most recently added Playlists first. Click Done.
Thankfully, we can control the order of the Playlists below this. Click Add a Section. Then select Single Playlist.
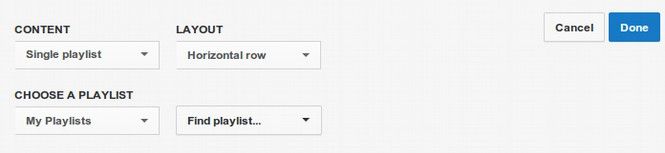
Click on the drop down arrow to the right of Find Playlist and select the Playlist you want to appear first. Then click Done. Repeat this to add the remaining Playlists. Playlists must have content in them for them to display on your Home page. Below is what the top half of our channel Home page looks like with the Browse Feature Box enabled and a section for All Created Playlists below the Featured Introduction video.
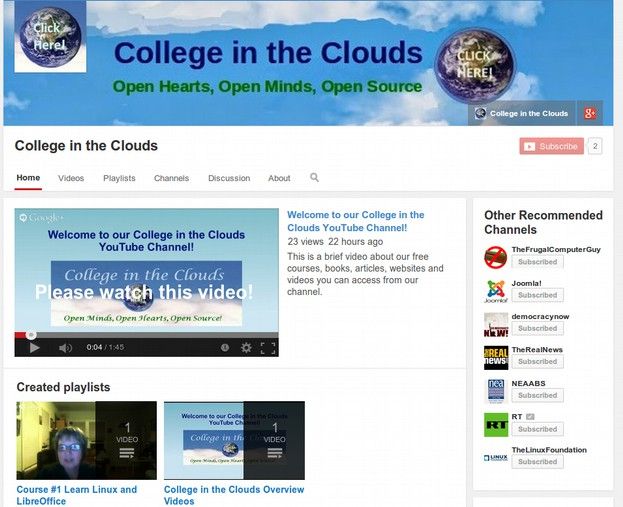
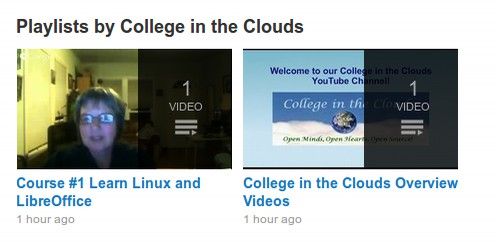
To the right of our Featured video is a box called Other Recommended Channels. We will work with this next. Below the Created Playlist Section are two more Playlists. The first is for any videos we place in the Overview Playlist and the second is for any videos we put in the Course #1 Playlist.
To the right of these individual Playlist sections is a box called Popular channels on YouTube.
We will look more at this box in a moment. First, click on the Course #1 Section Link. Then click on Play All. This will bring up a nice Playlist to the right of the video being played.
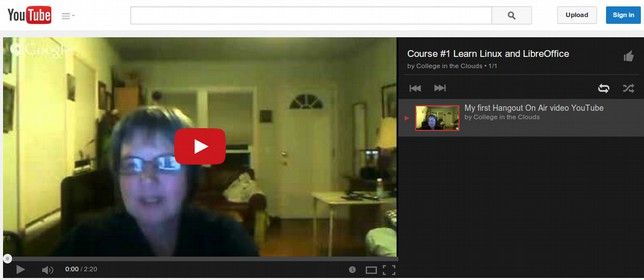
Videos added to this section will appear in a list to the right of the first video so that viewers will have an easy way of going from one video in the series to the next.
Create an Other Recommended Channels Box
To the right of our Featured Introduction video is a box called Featured Videos. This is not a very accurate name because folks may think that it contains videos featured on your channel. Thankfully, you can change its name by clicking on the hidden edit pencil in the upper right corner of the box. Then click Edit Module.
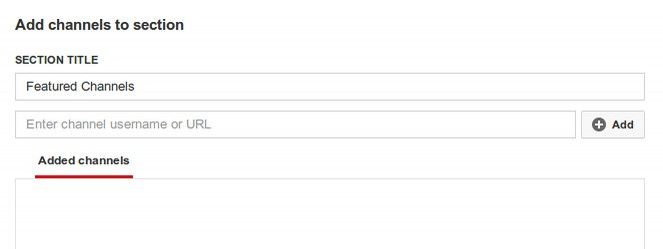
First change the Section Title to Other Recommended Channels. This lets viewers know that if they click one of these links they will be taken away from your channel to a different channel.
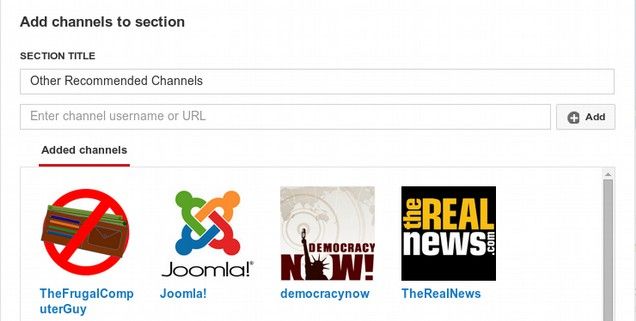
To add a channel to the list of Other Recommended Channels, copy the channel URL and paste it into the box. Then click Add.
This channel referral box can be very useful if your channel is part of a large national organization. You can use this box to provide links to the YouTube channels of all the other members of your organization. If you have more than one business and more than one active YouTube channel, you can also use this box to provide links to your other YouTube channels. We you have added all the links you want, click Done.
Should you leave the box called Popular Channels on YouTube?
Below the Other Recommended Channels box is a box called Popular Channels on YouTube. Many people delete this box. I think this is a mistake for a new channel owner with very little traffic. Leaving these links should help boost your page ranking with Google and YouTube. If you do not like the appearance of them, then add a bunch of links to other YouTube channels in your Other Recommended Channels box. Each link you add here will lower the Popular Channels on YouTube box on your Channel Home page. A nice arrangement is to have 8 links in your other Recommended Channels box. This will align your Popular Channels on YouTube box exactly with your second added section box.
Precautions to take when Creating a Custom URL
When you get a new YouTube channel, YouTube assigns you a very confusing URL that consists of a long string of random numbers and letters. You can change the URL to a more descriptive URL – but use caution because you only get one shot at it and it cannot be undone later.
The mistake we made was creating the custom URL when we were logged into our Personal YouTube page rather than our Business YouTube page. So first verify that you are actually on the your Business YouTube Home page. Then click on your Channel icon in the upper right corner of this page.
Then click on the little Settings wheel that is just to the right of the Creator Studio button.
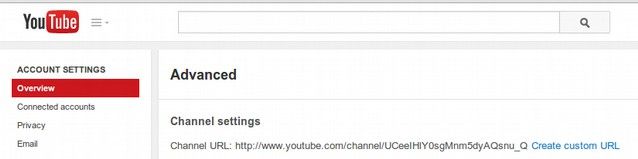
This is the Account Settings overview page. It is also called the Advanced Account Settings page. To create a custom URL, click on the small blue text that says Create Custom URL.
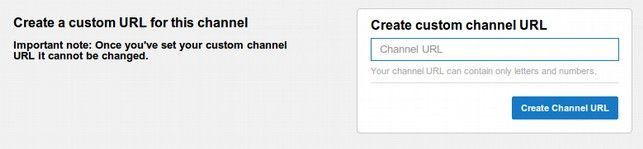
Note that this change cannot be undone. Your channel URL will always begin with youtube.com/user. So the text in the box is merely for what will be added after that.
If the URL ending text you want has already been taken by someone else, or in our case been taken by our personal channel, you will need to get creative. You can add “channel” or “hq” for headquarters to the end of the name you want. Or you may decide to start over with a completely different name. Just be aware that once you choose a URL channel name here, it cannot be changed. So think about it before clicking the Create Channel URL button.
When you are done your custom URL will look like this:
http://www.youtube.com/user/yourcustomchannelname
This finishes creating the intro video. In the next article, we will review some of the potential uses for your new YouTube channel.