
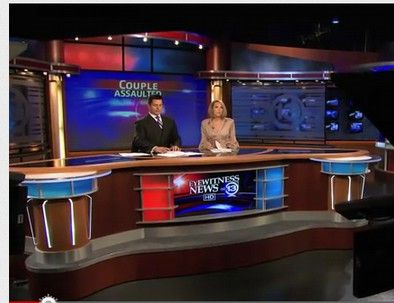
The only real drawback of a green screen studio is that you will have to let your guest know not to wear clothing that is a bright green. A virtual studio has many advantages over a traditional studio. The biggest is cost. A real studio can cost more than $100,000 – just for the desks and big screen TV’s like we see on Nightly News programs and Daily Talk Shows. Also one cannot change sets. You are stuck with what you got. By contrast, a virtual studio costs less than $3,000 and can do much more than a real studio. The major costs for a virtual studio are:
A high speed 2.4 GHZ + computer (which may folks already own) which formerly did not even exists or cost way more than $10,000, but now costs less than $300 (for a 14 inch Google Chromebook).
A High Definition Camcorder, such as the Canon S30, or G10 which also used to cost all by itself way more than $10,000, but which now costs less than $1,000.
A High Quality Shotgun Microphone, which used to cost more than $1,000, but which now costs less than $200.
A High Quality Clip Mic Digital Recorder Multichannel system, which used to cost more than $1,000 but now costs under $300 (for a couple of Sony Clip Mics and the Tascam DR40 Digital Recorder we reviewed in our last article.
As all of the above items have been reviewed in previous articles, in this article, we will cover two additional purchases that will be needed to create your own green room studio. These are a diffuse lighting system and a green screen cotton cloth.
A Diffuse Lighting System, which used to cost more than $1,000, but now costs less than $200.
A 10 foot by 10 foot Green Screen Cotton Cloth, which used to cost more than $1,000, but now costs less than $60.
A Multi-Track Video Editing Program, which used to cost more than $1,000, but now is free thanks to the Open Shot Video Editor (that we will discuss in our next article).
A Layer Based Virtual Image, Text and Video Creation program, to create realistic looking virtual objects, three dimensional graphics and text. This kind of program also used to cost much more than $1,000, but is now free thanks to an open source software program called Pinta.
A Broadcasting Network to post your network on the Internet. This Broadcasting System used to cost hundreds of thousands of dollars, but is now free thanks to Google and You Tube.
A Virtual Office or website to act as a resource for folks who want to view past episodes and get more information about programs on your network. This also used to cost more than $10,000. But it is now less than $100 per year thanks to open source programs like Joomla and high quality, low cost servers like Fullhost.com.
Plan your Green Screen Room
Your room does not have to be very big. But it does have to be relatively sound proof. If there are any windows in the room (that allow sound in), cover these with old pillows or blankets and then tape them in place. Pick out a wall to use for the green screen backdrop and then get some brackets and a sturdy pole to hang the green screen fabric from either the ceiling or the top of the wall. Remember that you will need room for the camera and lighting to be several feet back from the wall as well as electrical outlets to power the video camcorder, digital recorder, computer and several lights. Finally, measure your wall and order enough fabric to fill the entire green screen wall without cutting the fabric. You want one large single piece of fabric with 6 inches doubled over at the top to create a holder for your pole.
Order your Green Screen Fabric
There is a benefit to buying a high quality cotton fabric. It will be stronger and the color will be more durable. But the main benefit is that you can hang it and then stream it and then blow dry out all of the wrinkles. Wrinkles are the death of most cheaper green screens as they cause shadows in the background. Some of these shadows can be removed with good multi-directional lighting. But it is best to not have wrinkles in the first place. A very light and bright green works best and you can find these online. We ordered an excellent 10 foot by 24 foot Chromakey Green Screen Muslin Cotton Backdrop from a company called Fancier Studio for only $60. This was enough to create 2 green screen rooms. This is their website: http://fancierstudio.com/
Order your lighting
We ordered three 2400 Watt “softbox” lighting stands with lights and screens from Fancier Studio for $160 – or $54 each. Alternately, you can go to your local thrift store and likely fine a few standup lamps with directional lights for as little as $10 each. The key is to have as much light as possible bouncing off of the walls and ceiling of your studio.
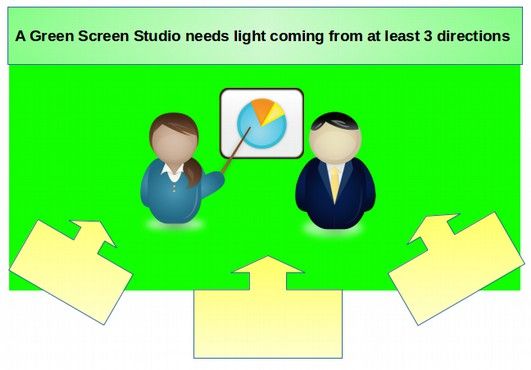
The goal of lighting is not only to reduce shadows from wrinkles in the green screen, but also to create a consistent color of green by having the right lights point to the left corner and the left lights pointing to the right corner. Adding a thin screen in front of the light will help make the light more diffuse and thus even out the background color.
Do you want a reader board?
Setting up a large teleprompter reader board near the camera keeps the speakers looking at the camera and staying on subject.
Create your Virtual Studio Background Set to match the dimensions of your Green Screen studio
A virtual studio produces video tracks much like a normal studio. A video editing program like Open Shot enables the use of as many tracks or layers as you want. A non-virtual studio might only use two tracks… the video itself and a sound track. The editing might only involve cropping the video, adding some transitions between the cutouts and adding some opening and closing graphics and sound at the beginning and ending of the video. But there are still only two tracks.
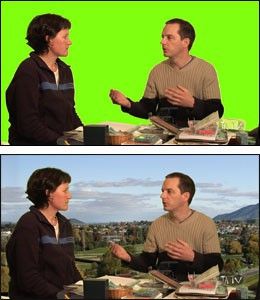
By contrast, a virtual studio uses a “Green Screen” room to create a video of the humans in a virtual space. The green background is then digitally eliminated using the chromakey function of the Open Shot software and replacing it with a transparent background. This requires and allows several additional tracks or layers. These tracks begin farthest away from the viewer and typically include the following 6 tracks:
Track 1: Background Wall Images plus virtual 3D floor
Track 2: TV Screen inset into Background Wall (sometimes on and off) to display charts and or video clips and or interviews
Track 3: Green Screen Image of the humans actually in the Green Screen studio possibly standing but typically sitting in real chairs and possibly with a real desk or table in front of them.
Track 4: Virtual Desk bigger than real desk which is used to hide the real desk.
Track 5: Title images which typically scroll across the lower third of the screen.
Track 6: Audio Track
Below are some examples of real and green screen studios:

Virtual Studio to match YouTube
Below is how we created the graphic for a green screen studio wall that was 9x16 for display on YouTube.
Virtual studio Table 16 feet by nine feet The following tables is .5 inches by .5 inch boxes.
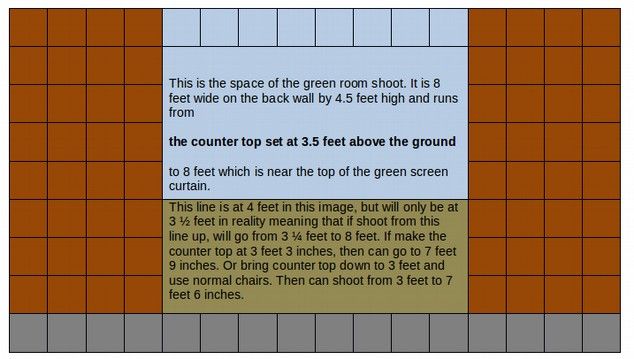
Virtual Studio Real Dimensions The virtual studio to be 8 feet high with a 1 foot floor, must be 16 feet wide to be 9 feet high. To equate pixels with feet, the You Tube Screen is 960 pixels wide by 540 pixels high. This means that the real studio must be 9.6 feet wide by 5.4 feet high. The above virtual room appears to be 8 feet high with a floor coming out. In fact, it is 9 feet high with no floor in front of it. Real studio can be half then 8 feet wide by 4 feet 6 inches high. Showing from 3 feet above base to 7 ½ feet above base.
The top of desk is 3 ½ feet above the ground and shoot from there up. Making the shoot 8 feet by 4 ½ feet tall by 8 feet wide (the blue area). Because desk is closer to the camera, it should appear to be 8 feet wide if the background shot is 9 feet wide. The key is to get 8 feet of the wall in the frame, this should put nearly the entire desk in the frame. Measure the background dimensions from the center line.
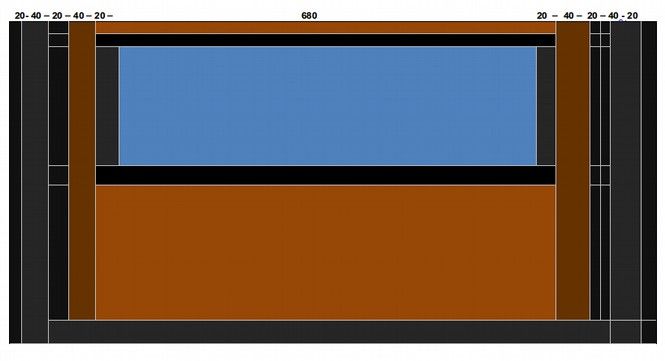
This is the virtual set background measured in pixels. This is the track behind the people.
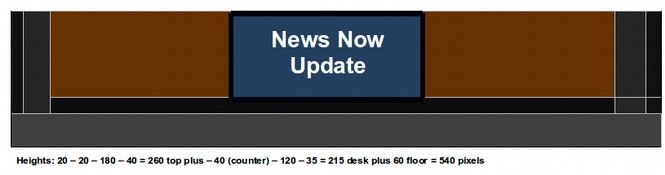
This is the virtual desk track in front of the people.
News Now Studio Design
You Tube Small Screen is 640 pixels by 360 pixels. (16/9) This converts to 960 pixels wide by 540 pixels high. Canon Wide Screen video output is also 16 to 9..The following image is 960 pixels to 540 pixels (9 1/2 inches by 5 1/2 inches).
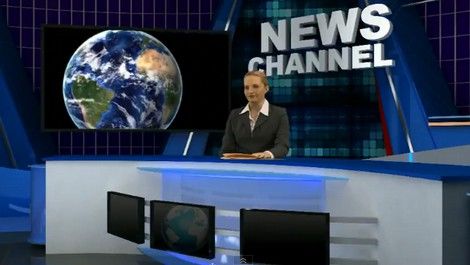
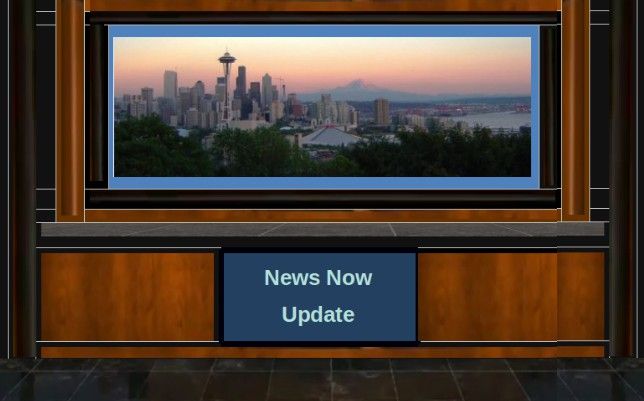
Here is the finished studio with the foreground and background tracks combined:
This concludes our article on creating your own virtual studio. In the next article, we will discuss tips for using the Open Shot Video Editor.